

Old School LAMP on Old School VM Setup
Linux Apache MySQL Perl on VirtualBox VM

Abstract
So let's say you end up with some really old Perl code sitting on a Linux server running Apache web server with a MySQL database and you need to replicate it onto your local environment so that you can fix it whilst not messing with production.
Sound Familiar?
Let's also say you're working on a MacBook so the paths are going to be completely different and change with every new minor version of OSX; and you don't want to use Docker because GCP is withdrawing support for it (or because you're GenX).
I shall now reveal this ancient knowledge...
Setup VirtualBox VM With Ubuntu 20 Server
Download and install the appropriate version of virtualbox from https://www.virtualbox.org/wiki/Download.
Hint: Never upgrade VirtualBox unless absolutely necessary, it's as troublesome as a yaml file.
Download the Ubuntu 20 Server LTS ISO image from https://releases.ubuntu.com/20.04.1/ubuntu-20.04.1-live-server-amd64.iso.
In VirtualBox: Machine > New.
Following Settings:
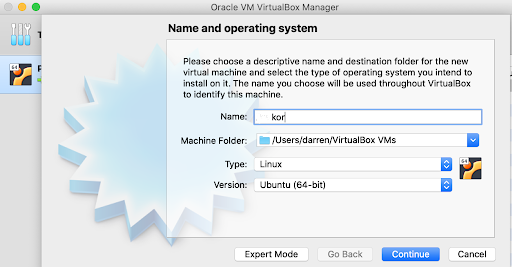
Set the memory size as appropriate for your host (I’d use at least 2Gb), use a standard virtualbox Virtual HDD and I’d recommend a fixed size (of about 30Gb).
After saving the VM, run it and you should get a prompt asking for a boot disk, browse to wherever you saved the Ubuntu image, and boot from it. It’ll take a while and a few messages of the VM going through it’s devices before the Ubuntu setup starts.
Keep all the default options on the Ubuntu setup, add the openssh server and none of the other options. After the VM reboots shut it down (click on the close x in the window and choose “Send shutdown signal”).
Set up Networking On Ubuntu
We’re now going to set up networking on a host only adapter, so that you can SSH and HTTP to the services on the VM from your host operating system.
Set Up Network on Host
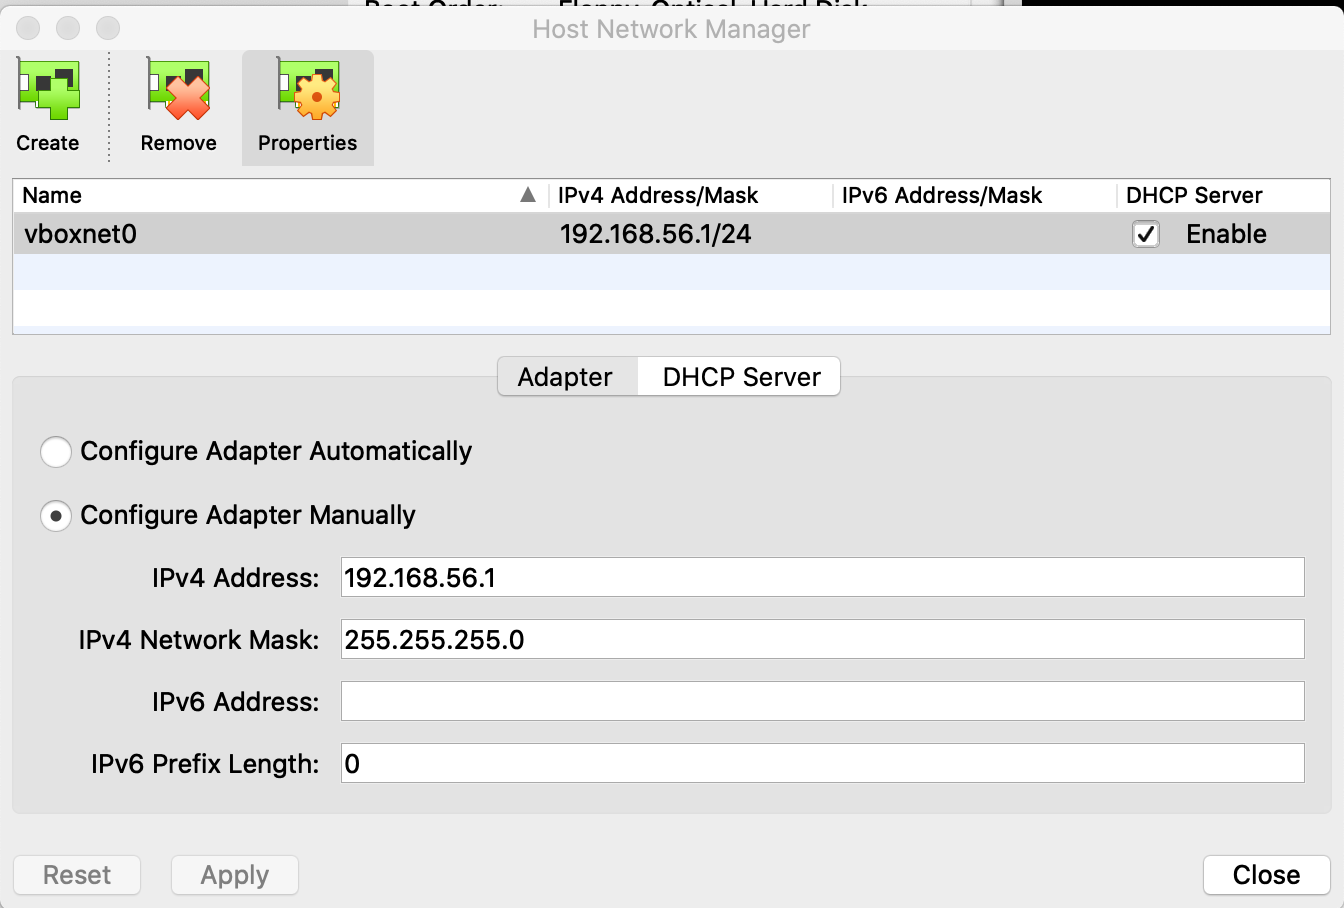
In VirtualBox, Go: File > Host Network Manager….
Ensure following configuration for vboxnet0:

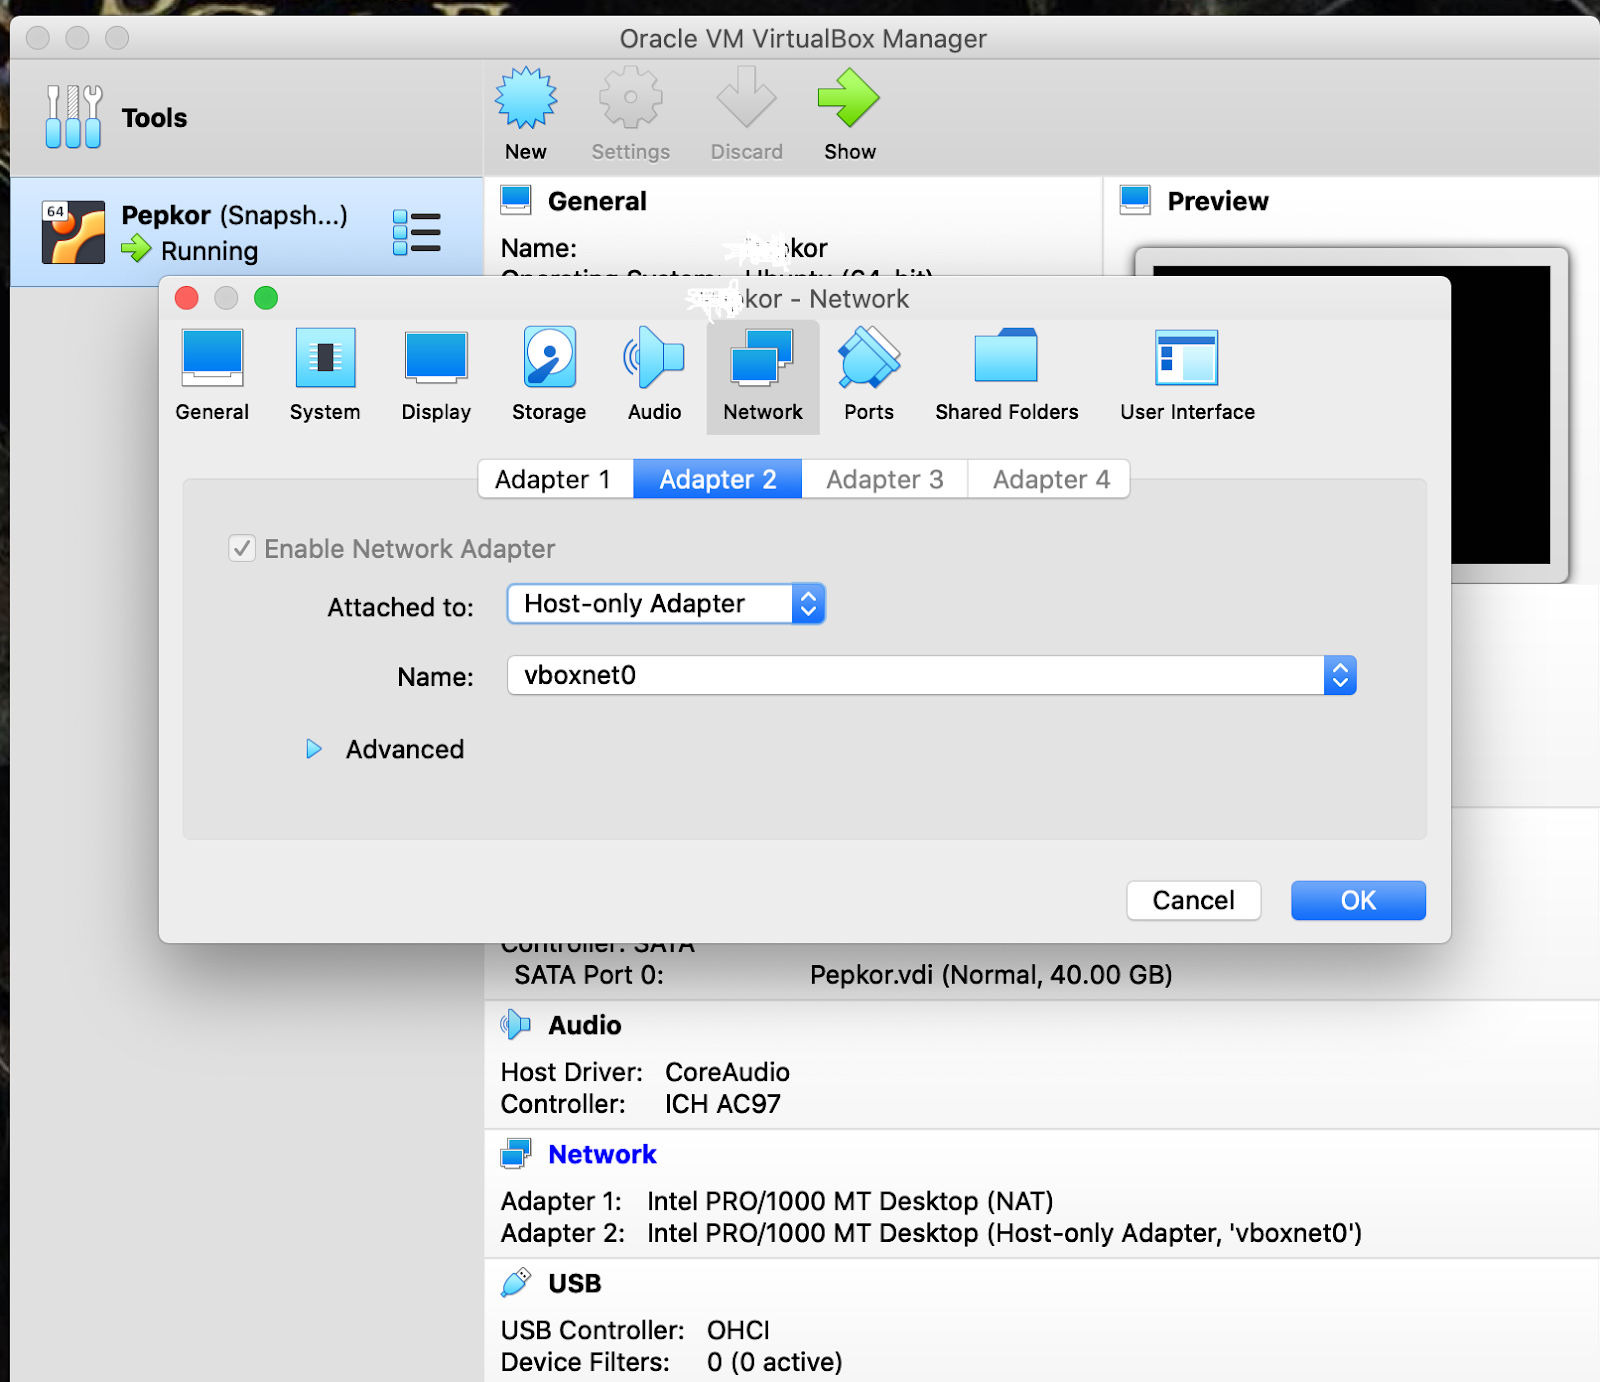
Now we’re going to add a host only adapter. In Virtualbox, click on the properties of your VM and go to networking. Add Adapter 2 as Host Only.
Set Up Network on VM
Okay, now log into your Ubuntu VM. If you’re used to setting up network interfaces, well that all changed as from Ubuntu 18 to all this newfangled netplan nonsense.
First check your current configuration like so (you might be prompted to do an apt install):
[04:44:15] darren@kor:~ $ ifconfig -a
enp0s3: flags=4163<UP,BROADCAST,RUNNING,MULTICAST>  mtu 1500
        inet 10.0.2.15  netmask 255.255.255.0  broadcast 10.0.2.255
        inet6 fe80::a00:27ff:fe7f:212f  prefixlen 64  scopeid 0x20<link>
        ether 08:00:27:7f:21:2f  txqueuelen 1000  (Ethernet)
        RX packets 720  bytes 804485 (804.4 KB)
        RX errors 0  dropped 0  overruns 0  frame 0
        TX packets 263  bytes 25689 (25.6 KB)
        TX errors 0  dropped 0 overruns 0  carrier 0  collisions 0

lo: flags=73<UP,LOOPBACK,RUNNING>  mtu 65536
        inet 127.0.0.1  netmask 255.0.0.0
        inet6 ::1  prefixlen 128  scopeid 0x10<host>
        loop  txqueuelen 1000  (Local Loopback)
        RX packets 207  bytes 29076 (29.0 KB)
        RX errors 0  dropped 0  overruns 0  frame 0
        TX packets 207  bytes 29076 (29.0 KB)
        TX errors 0  dropped 0 overruns 0  carrier 0  collisions 0
You’ll notice that your host only adaptor on 192.168.56.101 is missing. Edit your netplan configuration file like so:
[06:06:46] darren@kor:~ $ cd /etc/netplan/
[06:07:10] darren@kor:/etc/netplan $ ls -la
total 12
drwxr-xr-x   2 root root 4096 Oct 23 06:06 .
drwxr-xr-x 102 root root 4096 Oct 22 06:54 ..
-rw-r--r--   1 root root  194 Oct 22 05:10 00-installer-config.yaml

[06:07:13] darren@kor:/etc/netplan $ sudo vim 00-installer-config.yaml

# This is the network config written by 'subiquity'
network:
  ethernets:
    enp0s3:
      dhcp4: true
    enp0s8:
      dhcp4: false
      addresses:
        - 192.168.56.101/24
  version: 2
~

:wq

[06:08:14] darren@kor:/etc/netplan $ sudo netplan apply
[06:09:06] darren@kor:/etc/netplan $ ifconfig -a
enp0s3: flags=4163<UP,BROADCAST,RUNNING,MULTICAST>  mtu 1500
        inet 10.0.2.15  netmask 255.255.255.0  broadcast 10.0.2.255
        inet6 fe80::a00:27ff:fe7f:212f  prefixlen 64  scopeid 0x20<link>
        ether 08:00:27:7f:21:2f  txqueuelen 1000  (Ethernet)
        RX packets 1078  bytes 1292792 (1.2 MB)
        RX errors 0  dropped 0  overruns 0  frame 0
        TX packets 414  bytes 36733 (36.7 KB)
        TX errors 0  dropped 0 overruns 0  carrier 0  collisions 0

enp0s8: flags=4163<UP,BROADCAST,RUNNING,MULTICAST>  mtu 1500
        inet 192.168.56.101  netmask 255.255.255.0  broadcast 192.168.56.255
        inet6 fe80::a00:27ff:fe7f:b596  prefixlen 64  scopeid 0x20<link>
        ether 08:00:27:7f:b5:96  txqueuelen 1000  (Ethernet)
        RX packets 756  bytes 79441 (79.4 KB)
        RX errors 0  dropped 0  overruns 0  frame 0
        TX packets 528  bytes 101212 (101.2 KB)
        TX errors 0  dropped 0 overruns 0  carrier 0  collisions 0

lo: flags=73<UP,LOOPBACK,RUNNING>  mtu 65536
        inet 127.0.0.1  netmask 255.0.0.0
        inet6 ::1  prefixlen 128  scopeid 0x10<host>
        loop  txqueuelen 1000  (Local Loopback)
        RX packets 218  bytes 29938 (29.9 KB)
        RX errors 0  dropped 0  overruns 0  frame 0
        TX packets 218  bytes 29938 (29.9 KB)
        TX errors 0  dropped 0 overruns 0  carrier 0  collisions 0
You might need to reboot to get the networking updated with vboxnet0 on your host operating system.
Generate SSH Keys on Host
At this point, we may as well set up some SSH keys to connect to the VM, if you’re on Winblows, you’ll probably use putty to do this, on OS X or Linux go to the command prompt:
[10:35:15] darren@Darrens-MacBook:~ $ ssh-keygen -t rsa -b 4096 -C "darrenev@kor.com"
Generating public/private rsa key pair.
Enter file in which to save the key (/Users/darren/.ssh/id_rsa): /Users/darren/.ssh/kor_rsa
Enter passphrase (empty for no passphrase):
Enter same passphrase again:
Your identification has been saved in /Users/darren/.ssh/kor_rsa.
Your public key has been saved in /Users/darren/.ssh/kor_rsa.pub.
The key fingerprint is:
...
[10:35:53] darren@Darrens-MacBook:~ $ cd .ssh/
[10:40:11] darren@Darrens-MacBook:~/.ssh $ pbcopy < kor_rsa.pub
You’ll probably want to paste the keys into your repository account (such as bitbucket or github) at this point.
[10:42:08] darren@Darrens-MacBook:~/.ssh $ ssh-copy-id -i ~/.ssh/kor_rsa.pub darren@192.168.56.101
/usr/bin/ssh-copy-id: INFO: Source of key(s) to be installed: "/Users/darren/.ssh/pepkor_rsa.pub"
/usr/bin/ssh-copy-id: INFO: attempting to log in with the new key(s), to filter out any that are already installed
/usr/bin/ssh-copy-id: INFO: 1 key(s) remain to be installed -- if you are prompted now it is to install the new keys
darren@192.168.56.101's password:

Number of key(s) added:        1
Now try logging into the machine, with: "ssh 'darren@192.168.56.101'" and check to make sure that only the key(s) you wanted were added.
[10:47:15] darren@Darrens-MacBook:~/.ssh $ ssh -i ~/.ssh/kor_rsa darren@192.168.56.101
Welcome to Ubuntu 20.04.1 LTS (GNU/Linux 5.4.0-52-generic x86_64)
Exit back to Mac and make a cool shell file to avoid typing the SSH command every time you want to use your VM.
[10:53:10] darren@Darrens-MacBook:~ $ echo -e "ssh -i ~/.ssh/kor_rsa darren@192.168.56.101" > connect_kor.sh
[10:55:52] darren@Darrens-MacBook:~ $ chmod 777 connect_kor.sh
[10:56:19] darren@Darrens-MacBook:~ $ ./connect_kor.sh
Set Up Shared Folders
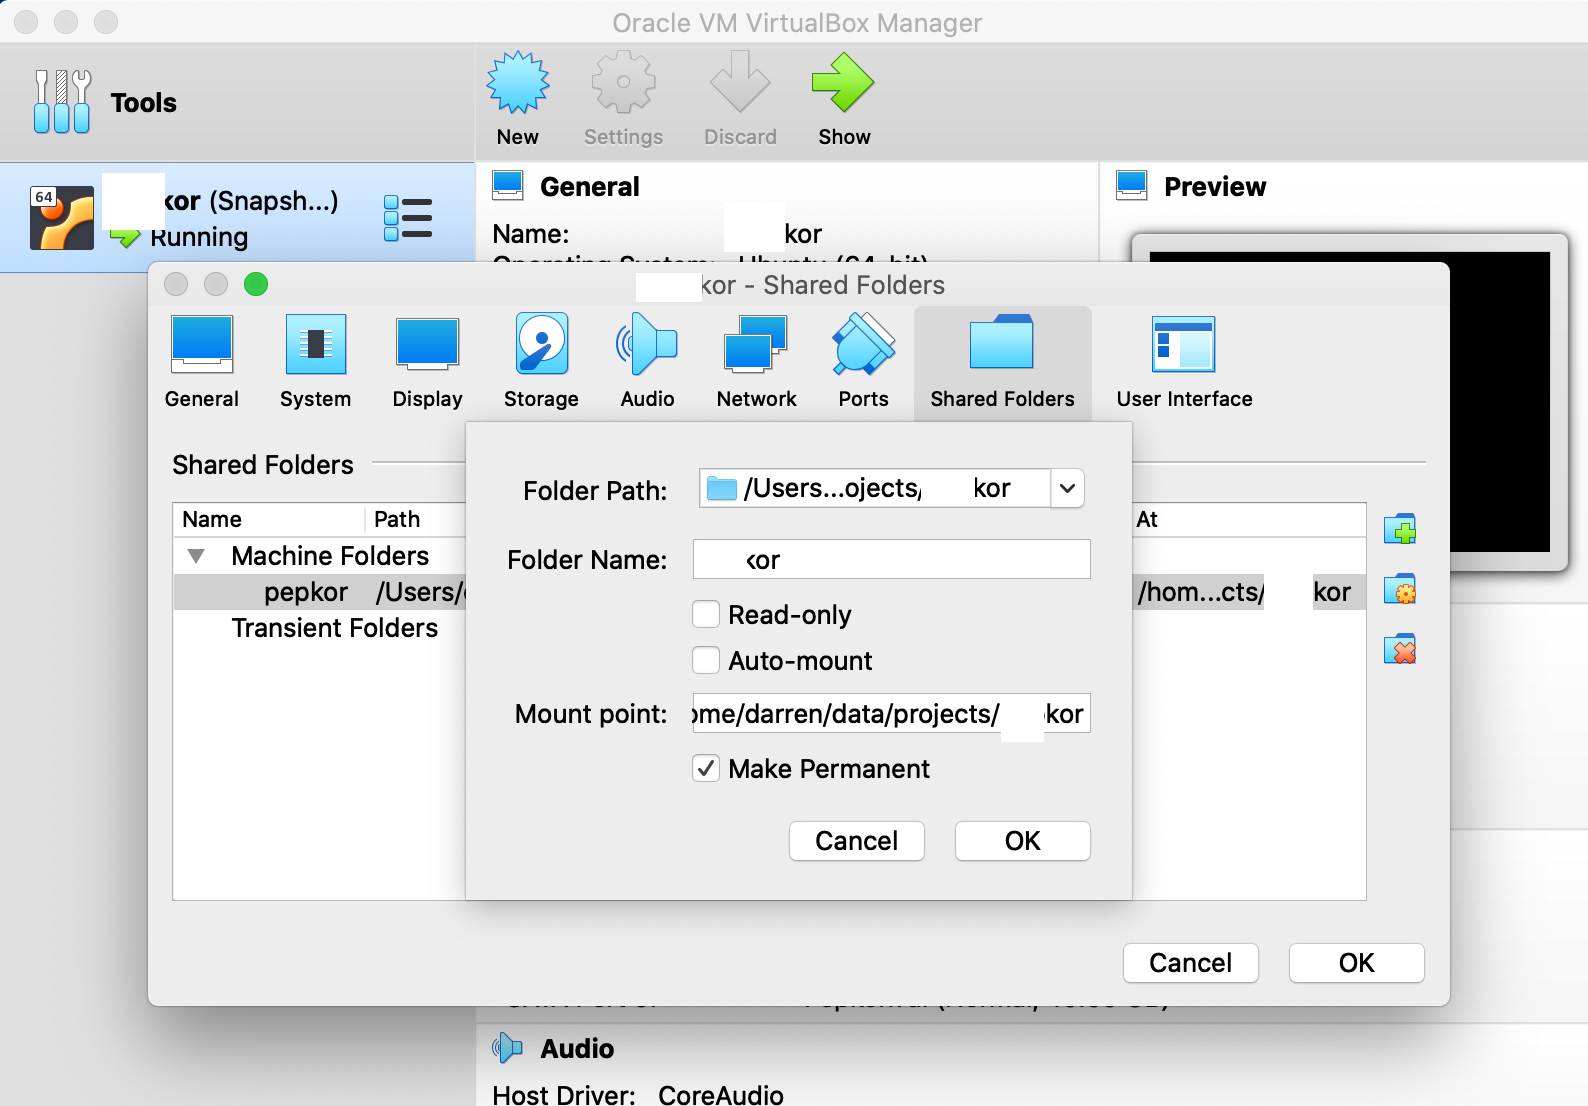
In VirtualBox, right-click on your VM: Settings > SharedFolders > Add. Set it up like so, don’t worry if you don’t have the “Make Permanent” option at this stage.
In your VM menu go: Devices > Insert Guest Additions CD Image.
SSH into your VM.
[06:09:18] darren@kor:/etc/netplan $ sudo mount /dev/cdrom /media/cdrom
[sudo] password for darren:

mount: /media/cdrom: mount point does not exist.
If you get the error message - which you shouldn’t - yet I did, here’s how I worked around it - I SCPed a copy of the VBoxGuestAdditions.iso file to my home directory on the VM and then mounted it. One could also download it.
Next steps:
[07:20:58] darren@kor:~ $ sudo apt-get update
[07:23:32] darren@kor:~ $ sudo apt-get install build-essential linux-headers-`uname -r`
[07:23:32] darren@kor:~ $ sudo /media/cdrom/./VBoxLinuxAdditions.run
Create the folder on your VM and then make it persistent by:
[07:23:32] darren@kor:~ $ sudo vim /etc/fstab

# /etc/fstab: static file system information.
#
# Use 'blkid' to print the universally unique identifier for a
# device; this may be used with UUID= as a more robust way to name devices
# that works even if disks are added and removed. See fstab(5).
#
# <file system> <mount point>   <type>  <options>       <dump>  <pass>
# / was on /dev/ubuntu-vg/ubuntu-lv during curtin installation
/dev/disk/by-id/dm-uuid-LVM-SNbIhFCUtpBL1pDGeaEIkSJdQeLysbctEXXmhuQTSyiV6CvBJcbtdWp9fReqwBDr / ext4 defaults 0 0
# /boot was on /dev/sda2 during curtin installation
/dev/disk/by-uuid/356083c7-705b-4dc7-bd45-235d59f14139 /boot ext4 defaults 0 0
/swap.img       none    swap    sw      0       0
pepkor  /home/darren/data/projects/kor       vboxsf  defaults        0       0
:wq

[07:28:01] darren@kor:~ $ sudo vim /etc/modules

# /etc/modules: kernel modules to load at boot time.
#
# This file contains the names of kernel modules that should be loaded
# at boot time, one per line. Lines beginning with "#" are ignored.
vboxsf
:wq
And then Reboot your VM.
Set Up MySQL
All pretty straightforward. Reference at Install MySQL on Ubuntu 20.04 LTS Linux .
[12:14:13] darren@kor:~ $ sudo apt install mysql-server

[12:15:33] darren@kor:~ $ sudo mysql_secure_installation

[12:15:33] darren@kor:~ $ sudo vim /etc/mysql/mysql.conf.d/mysqld.cnf

[sudo] password for darren:

# Instead of skip-networking the default is now to listen only on
# localhost which is more compatible and is not less secure.
bind-address            = 0.0.0.0
:wq

[12:18:06] darren@kor:~ $ service mysql restart

==== AUTHENTICATING FOR org.freedesktop.systemd1.manage-units ===
Authentication is required to restart 'mysql.service'.
Authenticating as: Darren Everitt (darren)
Password:
==== AUTHENTICATION COMPLETE ===

[12:19:52] darren@kor:~ $ sudo systemctl enable mysql
Synchronizing state of mysql.service with SysV service script with /lib/systemd/systemd-sysv-install.
Executing: /lib/systemd/systemd-sysv-install enable mysql
Get ahold of your schema dumps and setup your databases.
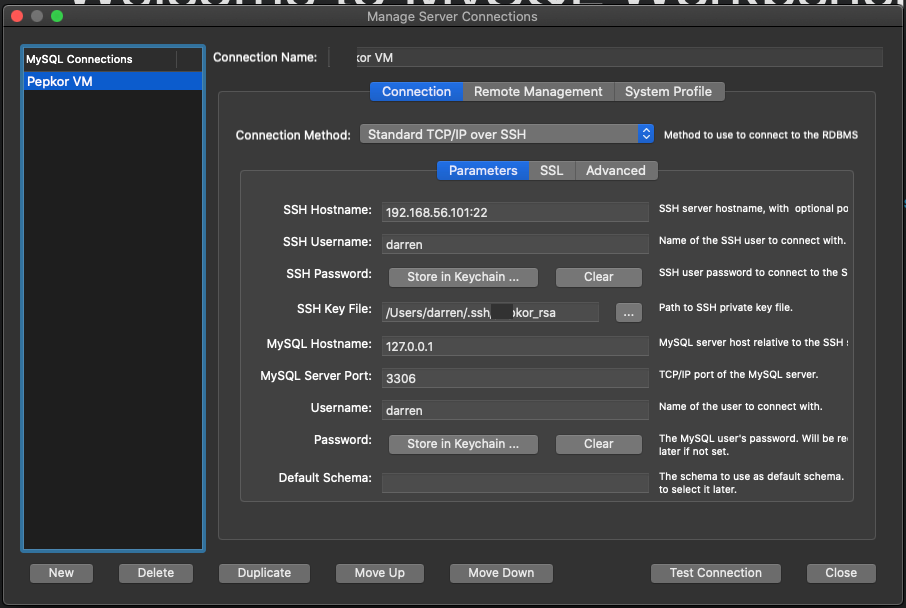
Next you may want to download SQLWorkbench for your host and set up the connection to MySQL on your VM like so:
Set up Apache
Install Apache
[05:23:51] darren@kor:~ $ sudo apt update
[05:24:52] darren@kor:~ $ sudo apt install apache2
Check the installation:
[05:26:01] darren@kor:~ $ apache2 -version
Server version: Apache/2.4.41 (Ubuntu)
Server built:   2020-08-12T19:46:17
If you're running a firewall:
[05:26:23] darren@kor:~ $ sudo ufw app list
Available applications:
  Apache
  Apache Full
  Apache Secure
  OpenSSH
[05:27:57] darren@kor:~ $ sudo ufw allow ‘Apache’
[05:29:56] darren@kor:~ $ sudo ufw status
Configure Apache and Site(s)
First let's set up the Apache VirtualHost. (https://www.liquidweb.com/kb/configure-apache-virtual-hosts-ubuntu-18-04/ is a fairly good guide for this.)
I'm going to use the really cool url kor.local to access this site!
You can set this up by adding the line 192.168.56.101 kor.local to your local hosts file (where 192.168.56.101 is the IP of the Ubuntu VM). On the VM add the line 127.0.0.1 kor.local to /etc/hosts.
This is simply a matter of creating a conf file in Apache's sites-available and using the a2ensite command.
Your apache VirtualHost configuration will look something like this (I've included some Perl API settings here:
<VirtualHost *:80>
    DocumentRoot "/var/www/kor/"
    ServerName kor.local
    ServerAlias kor.local

    SetEnv APPLICATION_ENV "default"
    ErrorLog ${APACHE_LOG_DIR}/kor.local-error.log
    CustomLog ${APACHE_LOG_DIR}/kor.local.access.log combined

    Header set Access-Control-Allow-Origin "*"
    Header set Access-Control-Allow-Methods "POST, GET, OPTIONS"
    Header set Access-Control-Allow-Headers "Content-Type"

        PerlRequire /var/www/kor/API/API.pm
        <Location /API>
           SetHandler perl-script
           PerlResponseHandler API
           AllowMethods GET POST OPTIONS
        </Location>

</VirtualHost>
On the Ubuntu VM, create this file at root@kor:/etc/apache2/sites-available/kor.local.conf.
Get the necessary code installed. I normally do this in my shared folder. You can do this from your host or client (you may need to set up ssh keys for your client VM). Once you have the code, create symlinks in apache’s web root directory.
Hint: It'd be really cool if you could just check it out to your host machine and then set it up as a project in your favourite IDE.
We have three directories per project, let's say:
- Host Project Directory:
darren@Darrens-MacBook:~/projects/repos/kor - VM Project Directory:
darren@kor:~/projects/kor - Apache Project Directory:
root@kor:/var/www/kor
The Host Project Directory and the VM Project Directory are the shared folder. I like to put them under my (Unix) user so that my user has permissions on all the files in the projects as this makes running the IDE and ad hoc debugging from the shell easier.
(I have had permissions issues before where VirtualBox insists on the shared folder being owned by the root user. I think I resolved this by adding my users to the root unix group.)
Create the Apache Project Directory using a symlink like so:
root@kor:/var/www# ln -s /home/darren/projects/kor kor
root@kor:/var/www# a2dissite 000-default.conf
root@kor:/var/www# a2ensite kor.local.conf
root@pepkor:/var/www# service apache2 restart
root@pepkor:/var/www# service apache2 status
● apache2.service - The Apache HTTP Server
     Loaded: loaded (/lib/systemd/system/apache2.service; enabled; vendor preset: enabled)
     Active: active (running) since Thu 2020-10-29 05:53:04 UTC; 10s ago
       Docs: https://httpd.apache.org/docs/2.4/
    Process: 2108 ExecStart=/usr/sbin/apachectl start (code=exited, status=0/SUCCESS)
   Main PID: 2127 (/usr/sbin/apach)
      Tasks: 55 (limit: 4620)
     Memory: 134.5M
     CGroup: /system.slice/apache2.service
             ├─2127 /usr/sbin/apache2 -k start
             ├─2128 /usr/sbin/apache2 -k start
             └─2129 /usr/sbin/apache2 -k start

Oct 29 05:53:03 pepkor systemd[1]: Starting The Apache HTTP Server...
Oct 29 05:53:04 pepkor systemd[1]: Started The Apache HTTP Server.
PAM Error
Instead of the above, you might get an error on the service restart, something like:
Satellite-E55 gdm-password]: pam_unix(gdm-password:auth): Couldn't open /etc/securetty: No such file or directory
Satellite-E55 su: pam_unix(su:auth): Couldn't open /etc/securetty: No such file or directory
Edit the file and insert the following contents:
root@pepkor:/var/www# vim /etc/securetty
And copy the contents from this file: https://drive.google.com/file/d/1Ffgezoc7oMCMayDQGI85g5mBLa2h4YlF/view?usp=sharing.
No IP Error
On the apache status listing, you might get an error like this:
pepkor apachectl[2513]: AH00558: apache2: Could not reliably determine the server's>
In this case:
[06:02:42] darren@pepkor:~/data/projects/kor $ cd /etc/apache2/
[06:46:50] darren@pepkor:/etc/apache2 $ vim apache2.conf
And to the bottom of the file, add:
ServerName localhost.
Install Perl Modules
Install the Perl Modules that your site needs to run.
I'll show you how to automate this in another blog post, yet you'll probably need to:
root@pepkor:/var/log/apache2# cpan DBD:mysql
root@pepkor:/var/log/apache2# sudo apt-get install libmysqlclient-dev
Hope you enjoyed this.

